
AppSense Insight
Install and Configure Guide
Version 10.0

AppSense Insight 10.1 Install and Configure Guide
Table of Contents
Install and Configure 1
Table of Contents 2
About Insight 4
Insight Architecture 4
Install and Start the Appliance 5
Appliance Prerequisites 5
Install the Appliance 7
Start the Appliance and Change the Password 8
Configure the Appliance Network Identity 9
Log on 10
Log on to the Insight Console as Administrator 10
Update 11
Update Insight components 11
Update history 12
License 13
Upload a License 13
Networking 14
Configure Insight Network Settings 14
SSL Certificates 15
Upload 15
Backup 18
Generate 19
API Keys 21
Status/Diagnostics 22
Reboot Server 22
Download Logs 22
Passwords 23
Data Management 24
Configure Data Collection 25
Remove Data from an Insight Server 26
Excluded Processes 28
Insight Agent 29
Installed Files 29
Installed Services 29
Agent Installer 29
Command Line Installer 31
Copyright © 2016 , AppSense. All Rights Reserved.
Page 2 of 35


AppSense Insight 10.1 Install and Configure Guide
About Insight
This guide describes how to install and set up the AppSense Insight appliance and agent. It also
describes how to configure the Insight Console and provides an overview of the data that is collected.
AppSense Insight provides organizations with an understanding of the activities, trends, and needs of
end users and their environments. When installed on endpoints, the Insight agent gathers data relating
to the users, endpoints, platforms, and applications. The data is analyzed and displayed in the Insight
Console through a variety of reports. Data from these reports can then be exported or printed and used
to help organizations identify issues and improve efficiency.
Insight assists organizations by rationalizing:
l User profile types, sizes, and health, including the size of each constituent of the user profile.
l User logon to a granular level, including details of the individual components of the logon down to
individual Group Policy items, Active Setup items, network mappings, scripts, and post-logon actions.
l User privilege utilization, including which applications require administrative privileges, how often
they are used, by whom, and on which endpoints.
l User application interactions including, whether applications are locally installed, published remotely,
virtualized, and when they were last used.
l User desktop delivery mechanisms to understand the utilization of each (VDI, Terminal Services, local
desktop) across an enterprise.
l User data locations and sizes, including where users save common business data, the size of those
locations, and the types of data.
Insight Architecture
Copyright © 2016 , AppSense. All Rights Reserved.
Page 4 of 35

AppSense Insight 10.1 Install and Configure Guide
Install and Start the Appliance
Appliance Prerequisites
The appliance runs on a hypervisor or virtual machine server in the enterprise demilitarized zone (DMZ).
From there the appliance provides secure communications using Secure Socket Layer (SSL) encryption.
Hardware and Hypervisor
AppSense provides separate media for the following hypervisors:
l VMware ESXi versions 5.5 to 6.0
l Hyper-V 2012 R2 and later
Each virtual appliance requires a minimum of 4GB RAM and 4vCPUs.
For environments with over 4,000 users, it is recommended that your appliance has a minimum of 8 cores
and 16GB of ram.
For information about setting the upload frequency, see Settings.
Supported Operating Systems and Technologies
The supported operating systems and technologies are detailed in the Maintained Platform Matrix
available on appsense.com.
DNS Settings
Insight requires internal DNS settings and a public DNS record. The appliance DNS settings must specify
the DNS servers in the Active Directory and the domain names it should search.
To access the Insight service on the Internet, you must set up a public DNS record using the Insight
server name. You can then use this public DNS name to generate the Certificate Signing Request (CSR)
and apply for a publicly trusted SSL certificate.
Copyright © 2016 , AppSense. All Rights Reserved.
Page 5 of 35
AppSense Insight 10.1 Install and Configure Guide
Ports
Configure the following IP ports:
Port Description
TCP
443
The web administration interface is available over SSL on http port 443. Clients can also use this
port but it is recommended that they connect to port 10443 so client traffic is segregated from
the web administration interface.
TCP
10443
For optimum performance clients should connect to port 10443.
TCP
80
Reserved for future use.
UDP
53
Domain Name System (DNS) on UDP 53.
Checklist of Required Information
To complete the installation and configuration of the Insight appliance you require the following
information.
Hypervisor Details
Hypervisor VMware ESXi or Hyper-V
Insight Network Details
Insight Appliance Name <appliance name>
Appliance IP address <IP address>
Subnet mask <IP mask>
Gateway <gateway IP>
DNS Details
DNS servers <IP addresses>
DNS search domains <domain names>
Copyright © 2016 , AppSense. All Rights Reserved.
Page 6 of 35

AppSense Insight 10.1 Install and Configure Guide
Install the Appliance
To install the Insight Appliance, the template must be imported into a hypervisor or virtual machine.
Installing the Appliance on ESXi using vSphere Client
When deployed to ESXi, the OVF template defaults networking to "Host Only" and must be manually
assigned the correct network before using the appliance
1. Download and extract the Insight ESXi zip on your local machine.
2. Start the VMware vSphere Client and log in to the host of vCenter Server.
3. From the menu, select File > Deploy OVF Template and follow the wizard.
Copyright © 2016 , AppSense. All Rights Reserved.
Page 7 of 35
AppSense Insight 10.1 Install and Configure Guide
Start the Appliance and Change the Password
NOTE: When you are deploying the appliance, connectivity can be lost when the appliance is
migrated to another node, for example, following a reboot. Network configurations are not be
applied because dynamic MAC addresses assigned in Hyper-V are lost when the node is moved. To
solve this issue, configure a static MAC address in Hyper-V. You must do this prior to booting the
appliance for the first time.
For further information, see MicrosoftKB 976724.
1. Start or power on the virtual machine and wait for the appliance to boot.
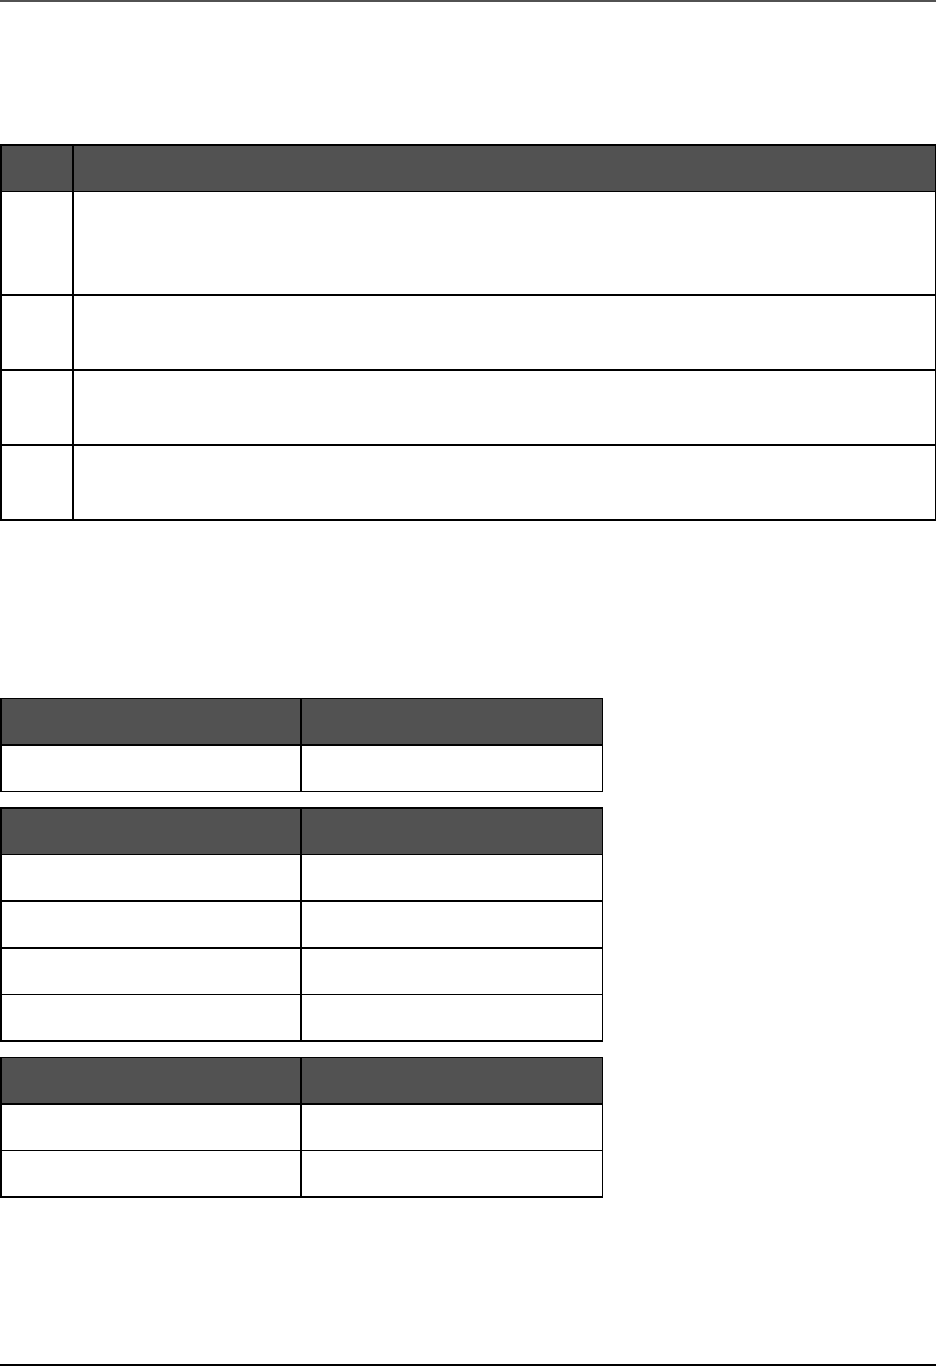
2. Press F2 to display the password prompt and enter the default password:
AppSense
3. The Main Menu displays. You must change your password before you can configure networking.
4. Select Change Password and press Enter.
The password prompt displays.
5. Type the default password,
AppSense
, and press Enter.
6. Type the new password and press Enter.
7. Type the new password again to verify it and press Enter.
The Main Menu displays with the Configure networking option now available.
CAUTION: The appliance password cannot be recovered or reset, so make sure you remember it, or
store it securely
Copyright © 2016 , AppSense. All Rights Reserved.
Page 8 of 35
AppSense Insight 10.1 Install and Configure Guide
Configure the Appliance Network Identity
1. In the appliance console, press F2.
The Password prompt displays.
2. Type the password and press Enter.
The main menu displays.
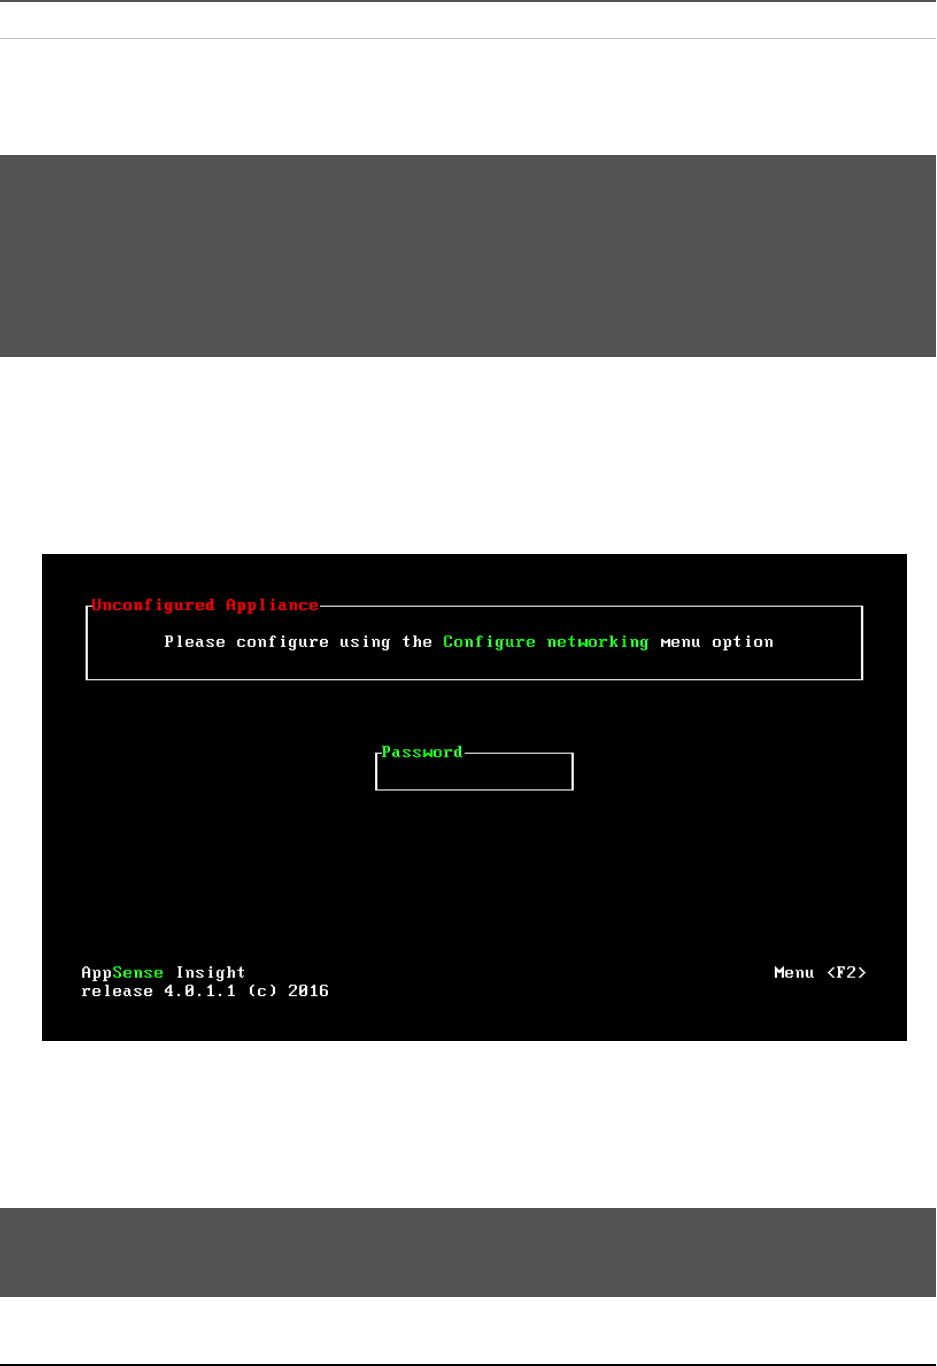
3. Select Configure Networking and press Enter.
The Configure networking box displays.
4. Enter a host name.
When you set a host name, the appliance uses it to generate a temporary self-signed SSL certificate.
5. Enter an IP address, subnet mask, and a default gateway.
The default gateway is the IP address of the internal gateway to services that include, for example, the
DNS server, the Active Directory service, the email server, and the file store.
6. Press F10 to save the network settings.
To apply the network settings, you need to reboot the appliance.
7. From the main menu, select Reboot and press Enter.
The server reboots, then displays the host name and IP address.
Copyright © 2016 , AppSense. All Rights Reserved.
Page 9 of 35

AppSense Insight 10.1 Install and Configure Guide
Log on
The Insight console is used to complete the setup and administer AppSense Insight, as well as viewing
the data collected via the agent.
Log on to the Insight Console as Administrator
1. Open a web browser and enter https://<server> in the address, where <server> represents the fully
qualified domain name (FQDN) of the Insight appliance, for example, Insight.appsense.com
NOTE: When you configure the appliance network settings, it generates a temporary, self-signed,
SSL certificate that uses the unqualified server name specified. Your web browser indicates that
there is a problem with the website's security certificate because it is self-signed and not issued
by a trusted certification authority (CA). You can trust this temporary certificate initially and
continue to the website. Replace this certificate with a trusted certificate containing the server's
fully qualified name, see SSL Certificates.
The browser connects to the Insight Admin Console for you to log in.
2. Log on to the console:
o
Username:
admin
.
The username is case sensitive.
o
Password: The password you configured when you started the appliance.
Copyright © 2016 , AppSense. All Rights Reserved.
Page 10 of 35
AppSense Insight 10.1 Install and Configure Guide
Update
View the current version of the Insight software you have installed and update the Insight Appliance by
uploading a patch, supplied by AppSense.
TIP: Insight patches are available from appsense.com.
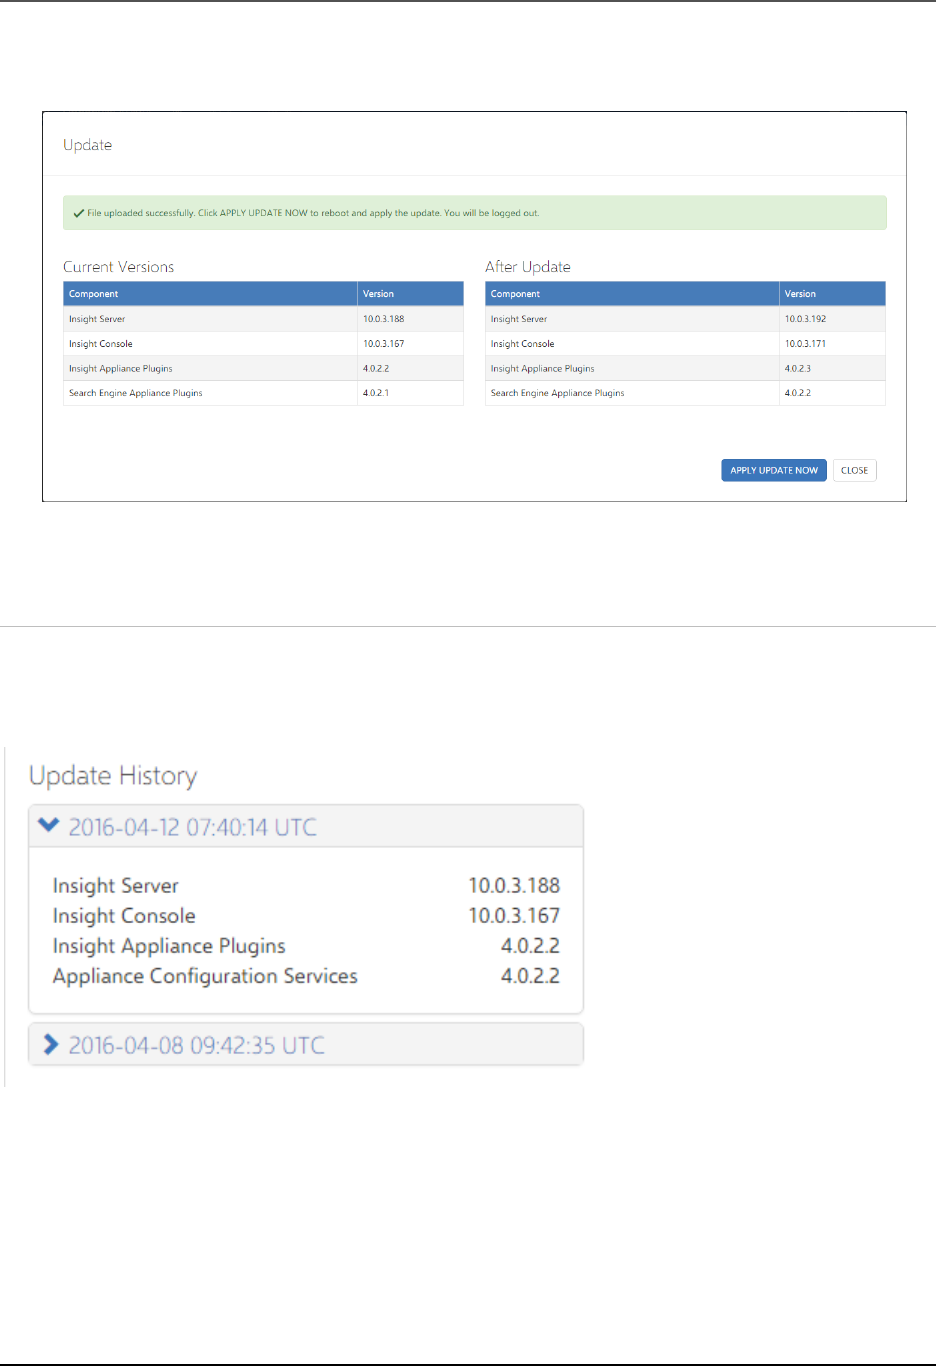
Update Insight components
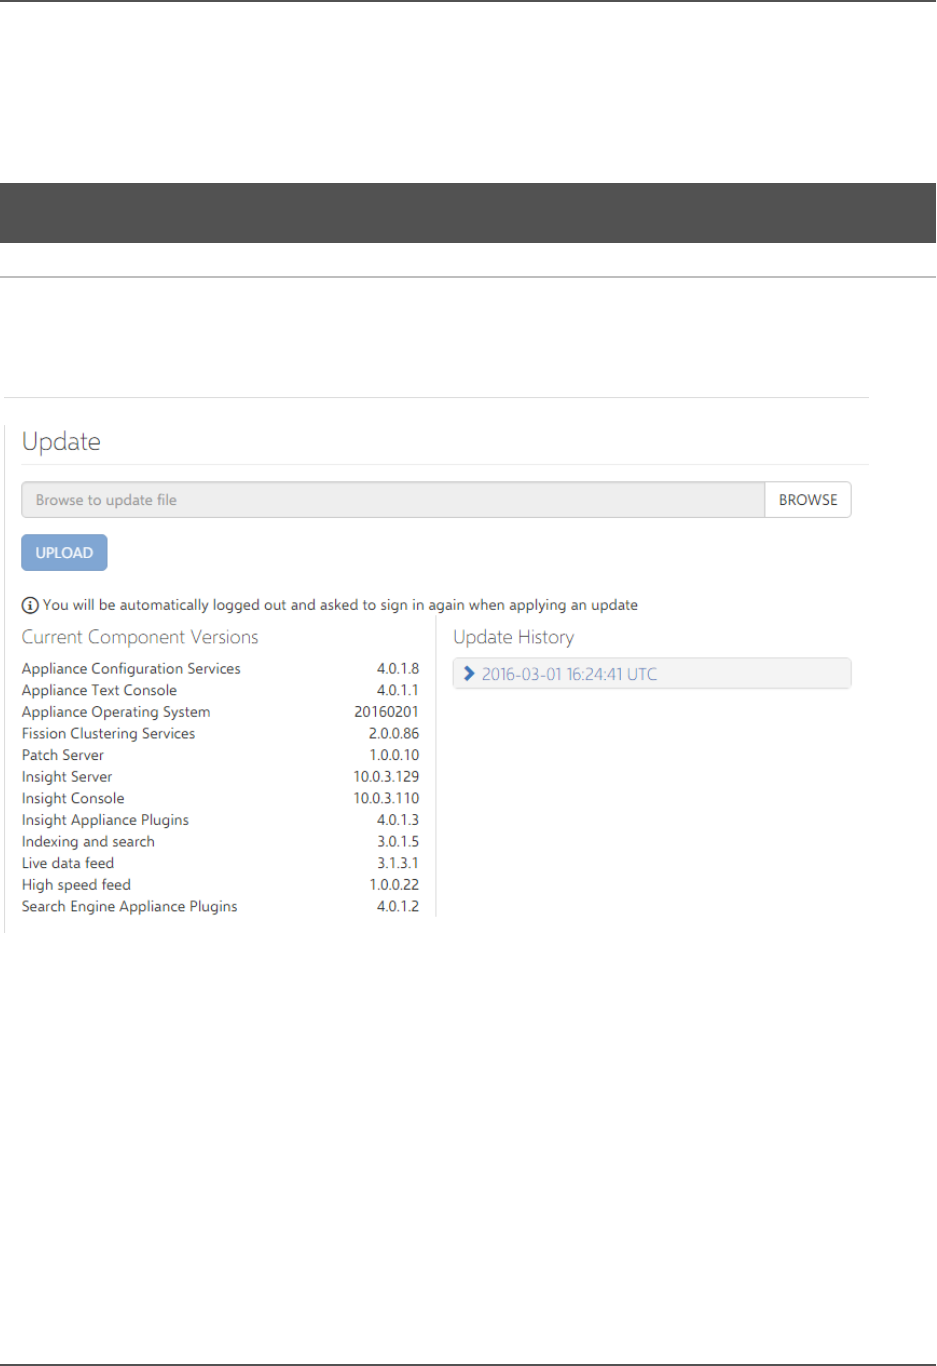
1. Select Settings > Update.
The screen shows the current version of each of the installed components.
2. Click BROWSE and navigate to the required Insight BIN file.
Copyright © 2016 , AppSense. All Rights Reserved.
Page 11 of 35
AppSense Insight 10.1 Install and Configure Guide
3. Click UPLOAD.
A summary screen displays the current component versions and those of the uploaded update.
4. Click APPLY UPDATE NOW.
The appliance automatically reboots and the login screen is displayed once the update is complete.
Update history
Select Settings > Update to view a history of the updates that have been applied to your Insight
Appliance. The history shows when each update was applied and which component was included.
Copyright © 2016 , AppSense. All Rights Reserved.
Page 12 of 35
AppSense Insight 10.1 Install and Configure Guide
License
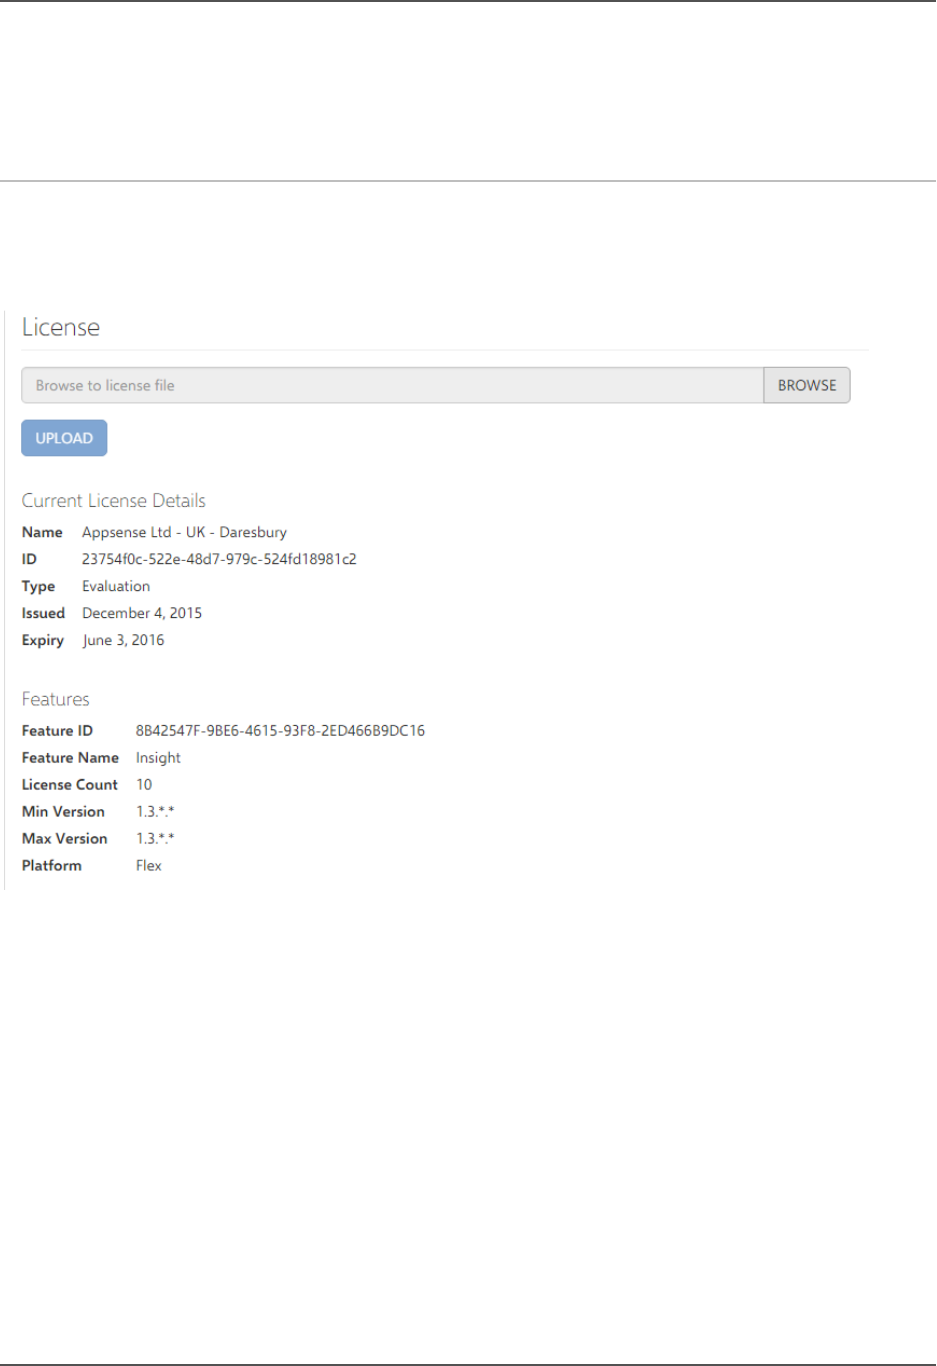
To view details of the installed license, select Settings > License.
Upload a License
To obtain an Insight license, contact customerservices@appsense.com.
1. Select Settings > License.
2. Click BROWSE and navigate to your license file.
3. Click UPLOAD.
Details of the uploaded license are displayed.
4. Click APPLY LICENSE.
If valid, the proxy server restarts and the license is applied. License Details are updated to show the newly
applied license.
Copyright © 2016 , AppSense. All Rights Reserved.
Page 13 of 35

AppSense Insight 10.1 Install and Configure Guide
Networking
In Network settings, you specify DNS the servers used to resolve Network Time Protocol (NTP) server
addresses. You can also reconfigure the default external NTP servers with your own internal servers to
ensure clocks are synchronized across your network.
Configure Insight Network Settings
1. Select Settings > Networking from the navigation pane.
2. Update the following settings as required:
o
Fully Qualified Domain Name (FQDN) of your insight server.
o
DNS Server IP address - Add the IP address of all DNS servers in your Active Directory.
o
DNS Search Domains - Add all domains required to resolve DNS lookups.
o
NTP Servers - Add the server addresses or FQDNs of the NTP servers you want to use. Insight
is configured with the addresses of three default NTP servers. If you use your own NTP servers,
replace the default addresses with the addresses of your own. You can use a maximum of
three NTP servers and a minimum of one.
To update the settings, enter a new value and click the + button.
To remove a server or search domain, click the appropriate x button.
3. Click APPLY SETTINGS to update any changes to the FQDN.
Copyright © 2016 , AppSense. All Rights Reserved.
Page 14 of 35
AppSense Insight 10.1 Install and Configure Guide
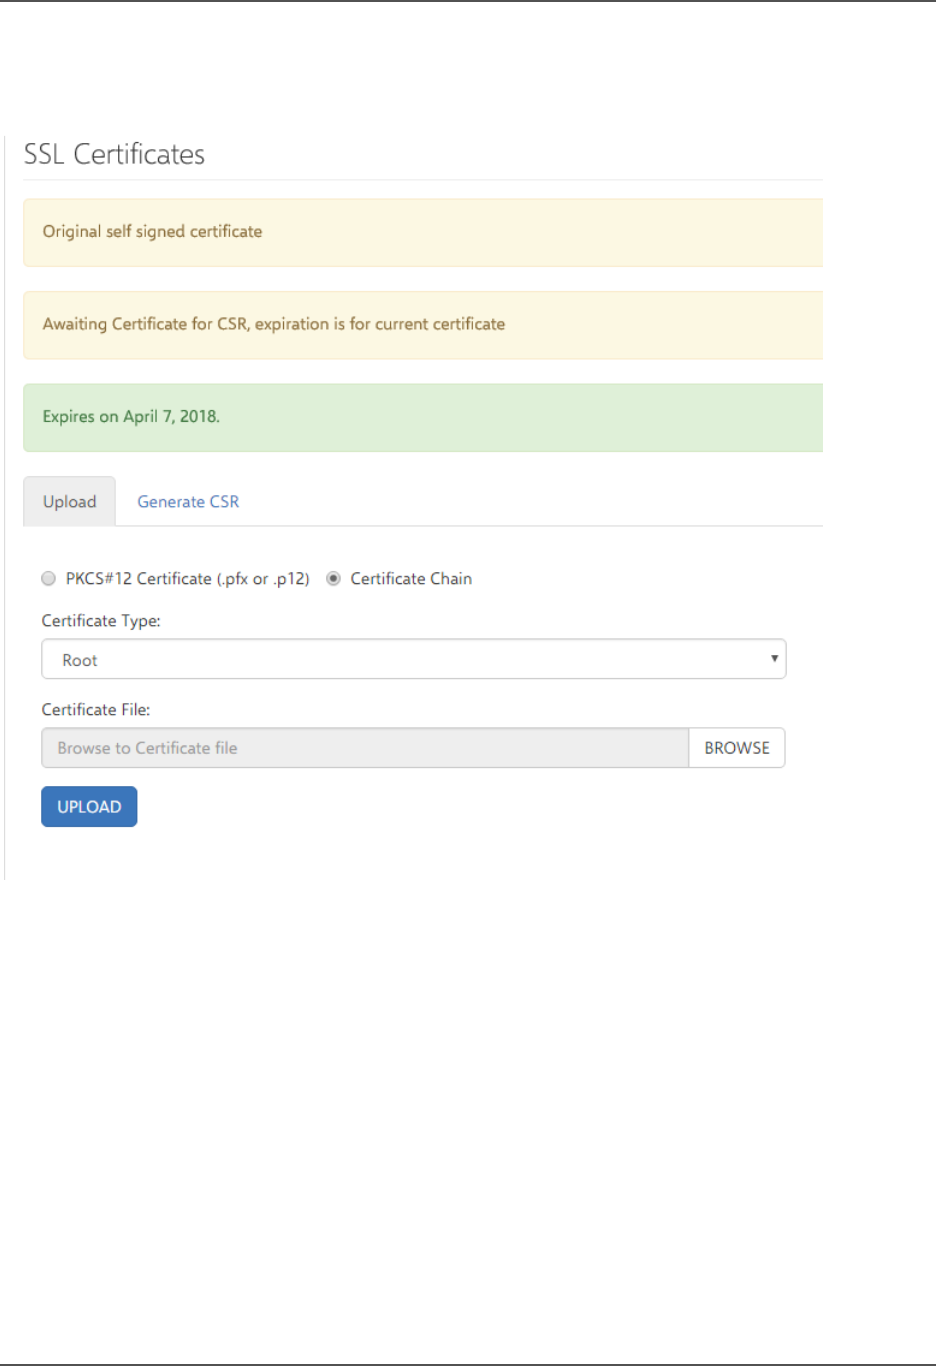
SSL Certificates
Use the SSL Certificates area to upload and backup certificates and to generate certificate change
requests.
Upload
Certificates for both Private and Public CAs can be applied to the Insight appliance. Most major public CA
root certificates are included in the Insight appliance and in client operating systems for the computers
and devices that support the Insight client.
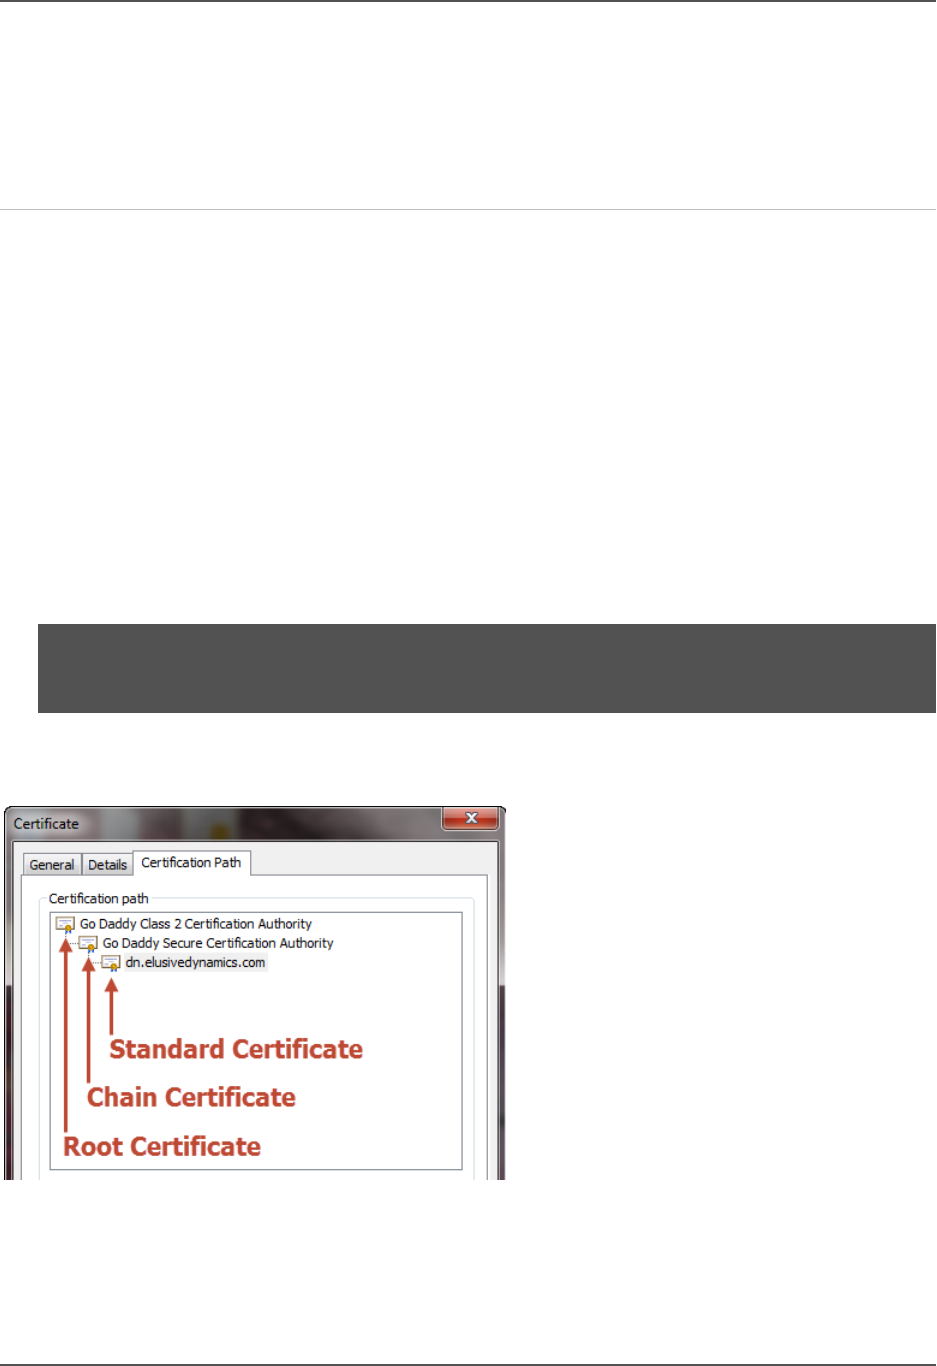
You must have the root certificate from your Private CA. If your CA is a subordinate CA you will require its
certificate (intermediate/chain), any other subordinate CA certificates and the root certificate.
Insight uses 2048-bit RSA certificates in Base64 PEM format which must be installed in the following in
order:
1. Root Certificate
2. Chain Certificate (Intermediate)
NOTE: If your intermediate certificate is a bundle, each certificate in the chain must be added in
reverse hierarchical order.
3. Standard Certificate (Web)
The entire certificate chain is required for a successful upload.
Copyright © 2016 , AppSense. All Rights Reserved.
Page 15 of 35
AppSense Insight 10.1 Install and Configure Guide
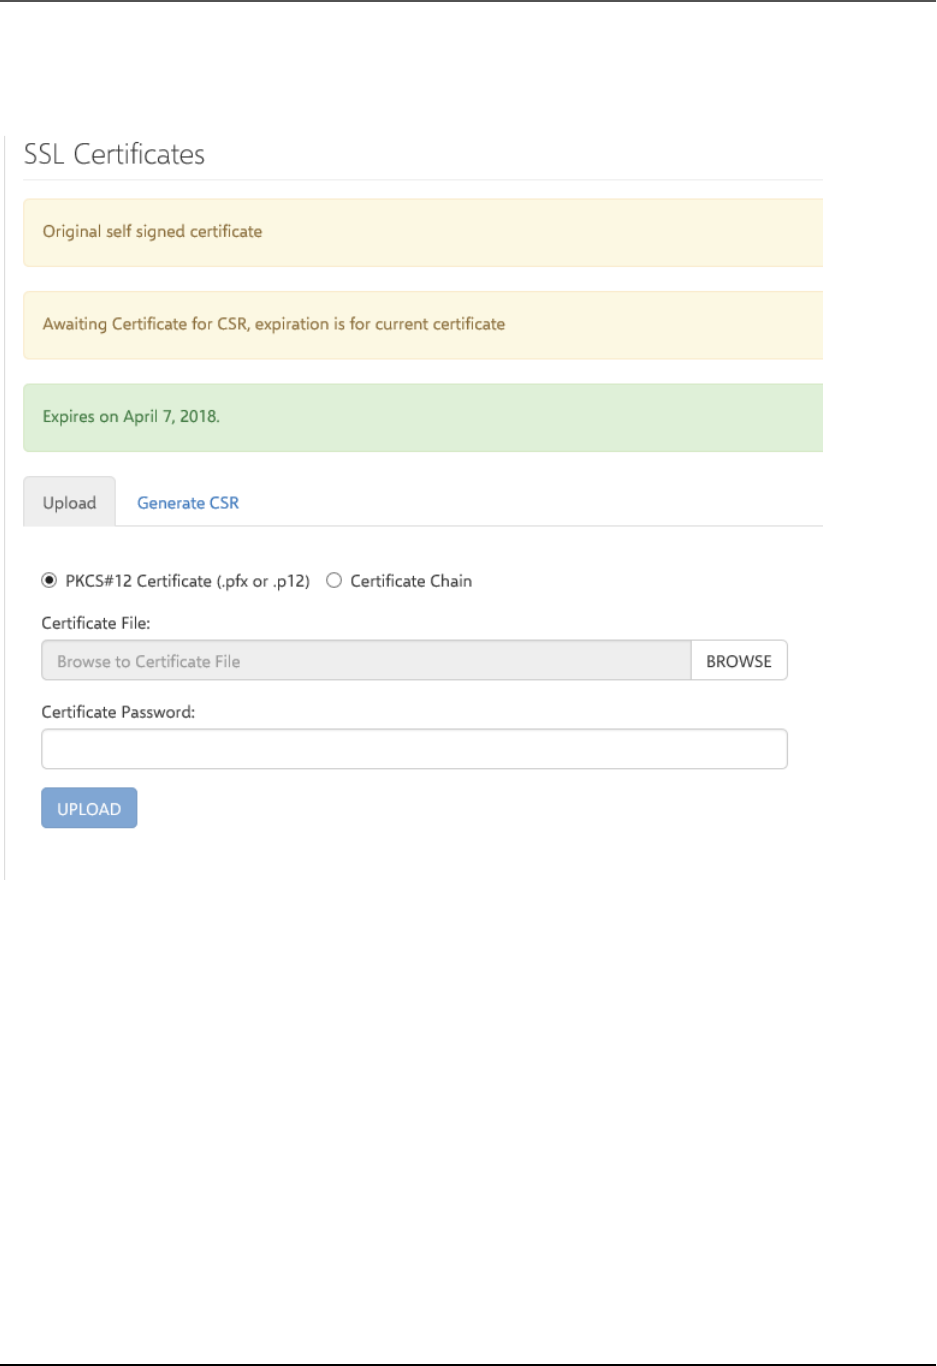
Apply a PKCS#12 Certificate to Insight
1. Select Settings > SSL Certificate > Upload.
2. Select PKCS#12 Certificate (.pfx or .p12).
3. Click BROWSE and select your certificate.
4. If the certificate uses password encryption, enter the appropriate password.
5. Click UPLOAD.
If successful, a message confirms that the certificate has uploaded. The web proxy service restarts and the
uploaded certificate is applied.
Copyright © 2016 , AppSense. All Rights Reserved.
Page 16 of 35
AppSense Insight 10.1 Install and Configure Guide
Apply a Chain Certificate to Insight
1. Select Settings > SSL Certificate > Upload.
2. Select Certificate Chain.
3. Select Root from the Certificate Type drop-down.
4. Click BROWSE and select the root certificate for the chain.
5. Click UPLOAD.
If successful, a message confirms that the certificate has uploaded. The web proxy service restarts and
the uploaded certificate is applied.
6. Repeat this process for your Intermediate and Server certificates.
Copyright © 2016 , AppSense. All Rights Reserved.
Page 17 of 35
AppSense Insight 10.1 Install and Configure Guide
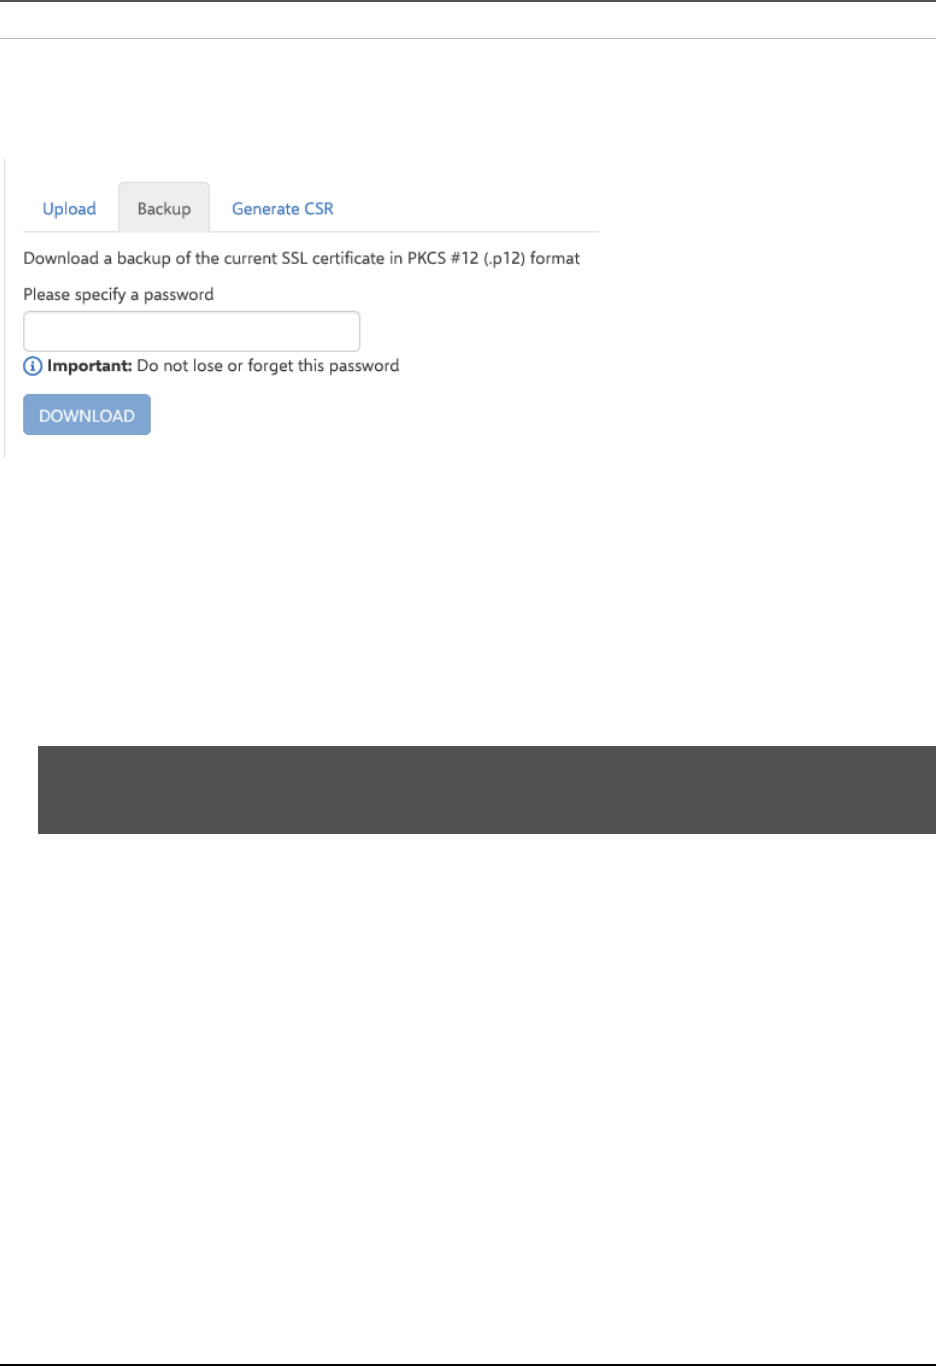
Backup
Download the current PKCS #12 / PFX certificate containing your encrypted SSL certificate and your
private keys from your Insight appliance. You can use this when configuring new installations of the
appliance without having to repeat the process of configuring an SSL certificate.
This option is not available if you are using the original self-signed Insight certificate.
1. Select Settings > SSL Certificate > Backup.
2. If required, enter an encryption password.
Encryption passwords are optional and add an extra level of security. If you set a password during
download, it must be entered to successfully upload your certificate.
CAUTION: Passwords are non-recoverable, so it is important that you remember the password or
store it in a safe location.
3. Click DOWNLOAD and save the certificate.
Copyright © 2016 , AppSense. All Rights Reserved.
Page 18 of 35
AppSense Insight 10.1 Install and Configure Guide
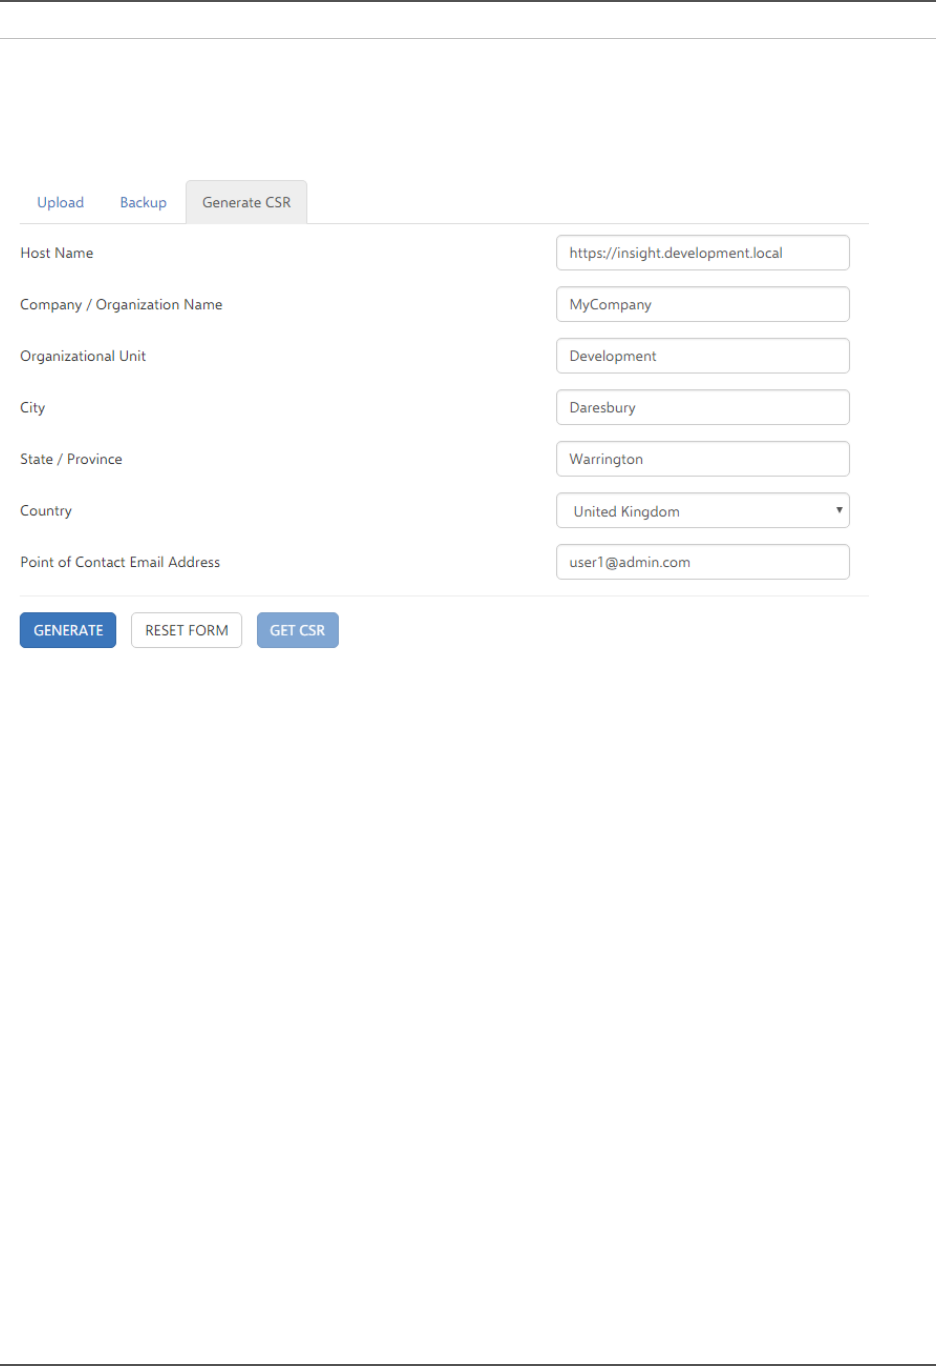
Generate
The Insight Console generates CSRs for public and private certificate authorities. The certificates can then
be uploaded and applied to the console.
1. Select Settings > SSL Certificate > Generate.
2. Select the Generate CSR Certificate type.
Click GET CSR to display the current signing request.
Copyright © 2016 , AppSense. All Rights Reserved.
Page 19 of 35

AppSense Insight 10.1 Install and Configure Guide
3. Complete the fields for your certificate.
Field Description
Host Name The host name of your server.
Organization Name The name of the organization requesting the certificate.
Contact Email The point of contact for the certificate request.
City The full name of the city where the organization is located. Do not use
codes or abbreviations.
State/Province The full name of the state or province where the organization is located. Do
not use abbreviations or codes.
Country The country where the organization is located.
Point of Contact
Email Address
An email address within your organization.
4. Click GENERATE.
A text box displays the certificate request data.
5. Copy the entire text including the lines containing BEGIN CERTIFICATE REQUEST and END
CERTIFICATE REQUEST and save it as a TXT file.
6. Click OK to close.
The certificate request can be submitted to a public certification authority or you can request a certificate
using a private certification authority.
Copyright © 2016 , AppSense. All Rights Reserved.
Page 20 of 35
AppSense Insight 10.1 Install and Configure Guide
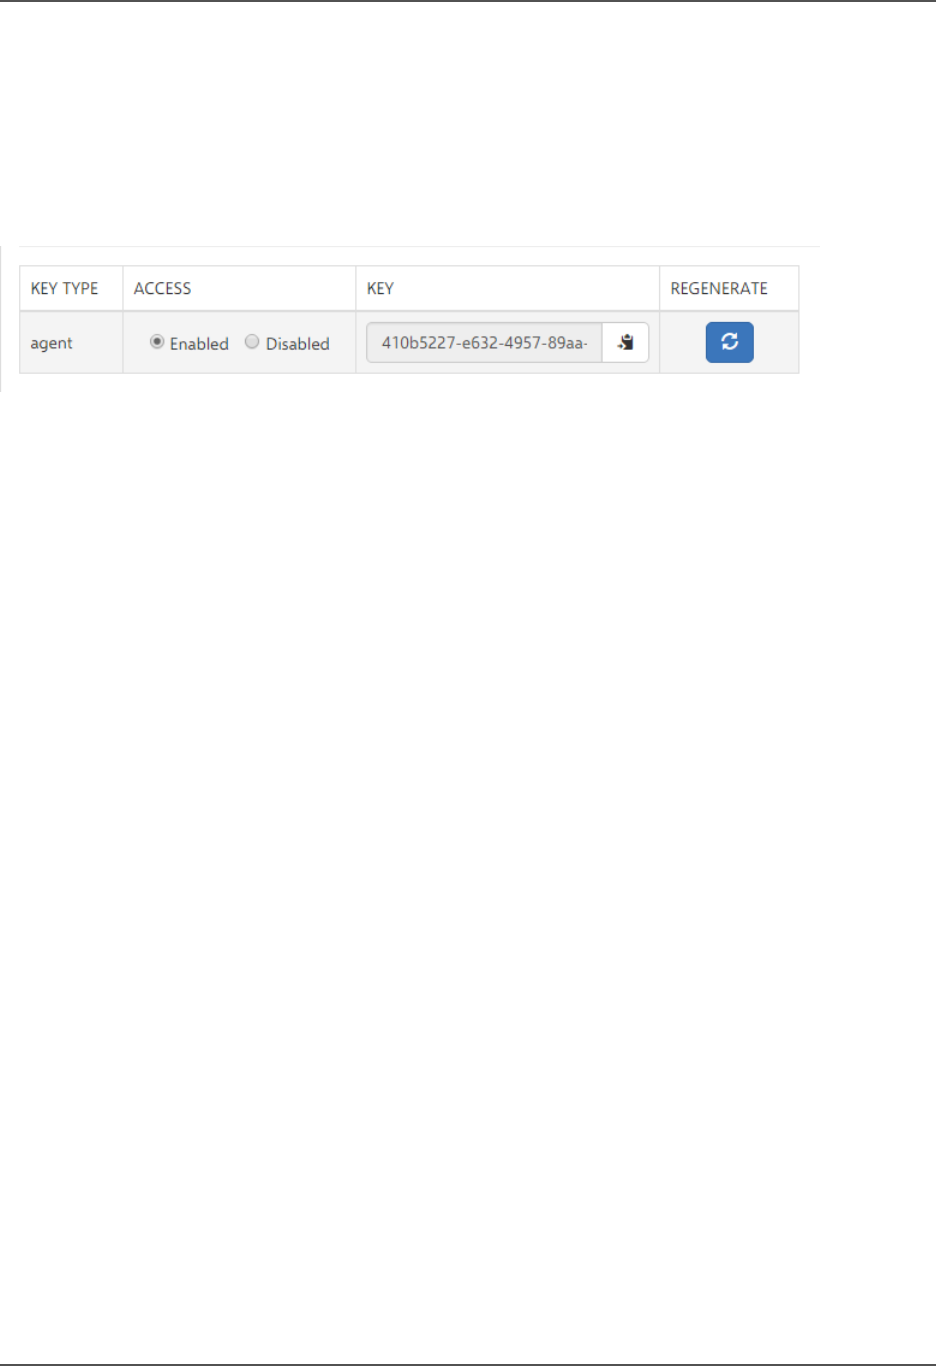
API Keys
Provides the API key required by Insight agents to enable connection to your Insight appliance.
If you disable the API key, endpoints using that key cannot connect to your Insight server. If you
regenerate your key, endpoints cannot connect with your server until they have been updated with the
new API key.
Copyright © 2016 , AppSense. All Rights Reserved.
Page 21 of 35

AppSense Insight 10.1 Install and Configure Guide
Status/Diagnostics
Reboot Server
Reboot your server directly from the Insight console. Insight and its services are unavailable for the few
minutes it takes to reboot.
Select Settings > Status/Diagnostics and click REBOOT SERVER.
Download Logs
Download appliance logs, which are used by AppSense Support, to check your installation and
performance and to troubleshoot your appliance. You may be asked for these reports when contacting
AppSense about Insight. You can download a previously generated log or generate a new log.
Select Settings > Status/Diagnostics.
Details of the last generated log are displayed. Download that log or click GENERATE NEW LOG to create
a new one.
Copyright © 2016 , AppSense. All Rights Reserved.
Page 22 of 35
AppSense Insight 10.1 Install and Configure Guide
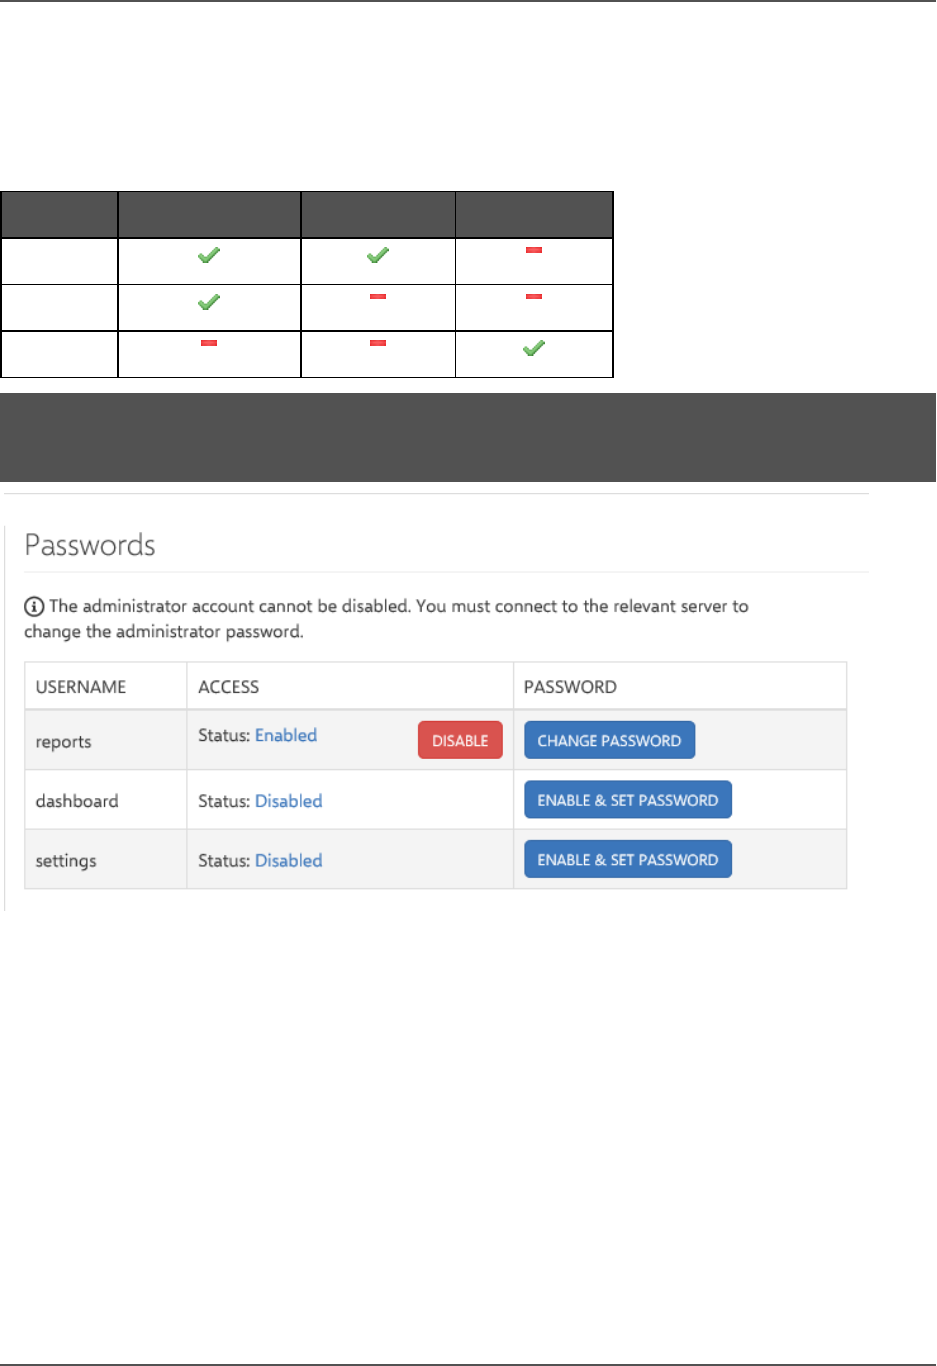
Passwords
Disable and enable accounts as required and change or set account passwords. There are three accounts
with different access levels to cater for various user requirements:
Username Dashboard Access Reports Access Settings Access
reports
dashboard
settings
NOTE: The administrator account cannot be managed through the console. The password is set
when you start the appliance. See Installing and Starting the Appliance.
Copyright © 2016 , AppSense. All Rights Reserved.
Page 23 of 35
AppSense Insight 10.1 Install and Configure Guide
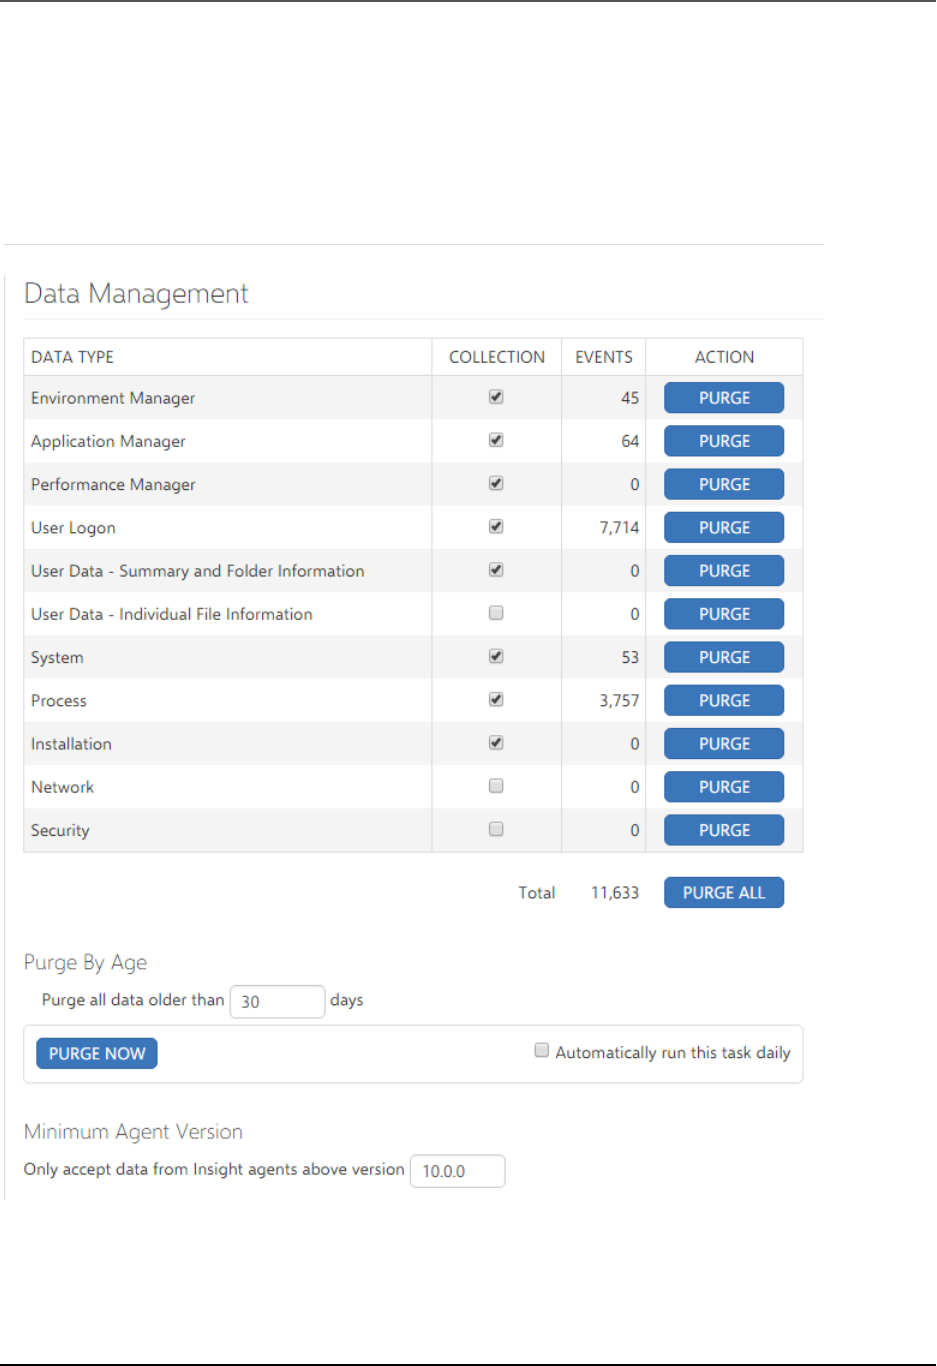
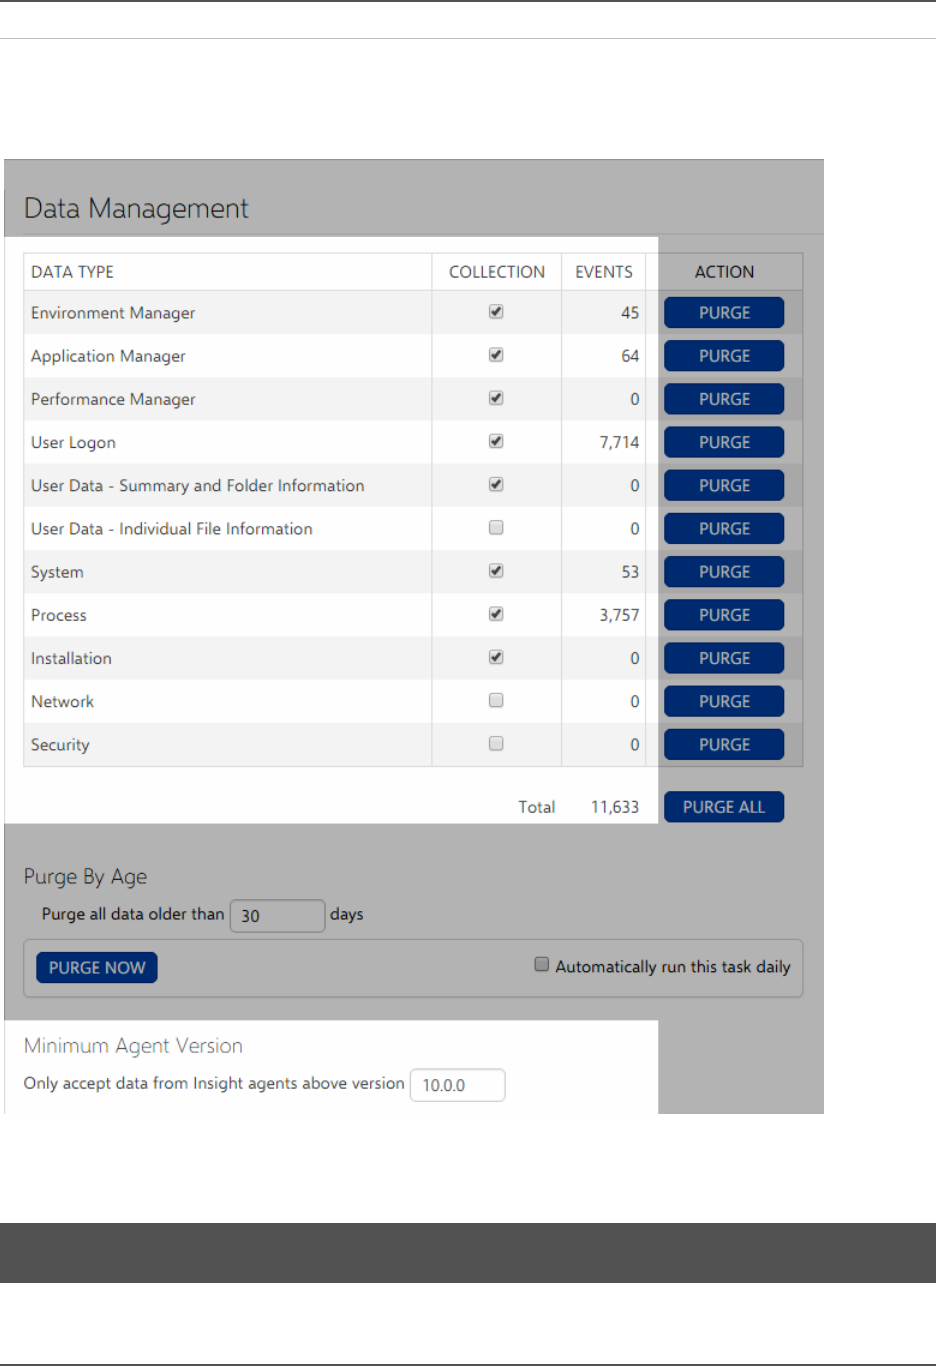
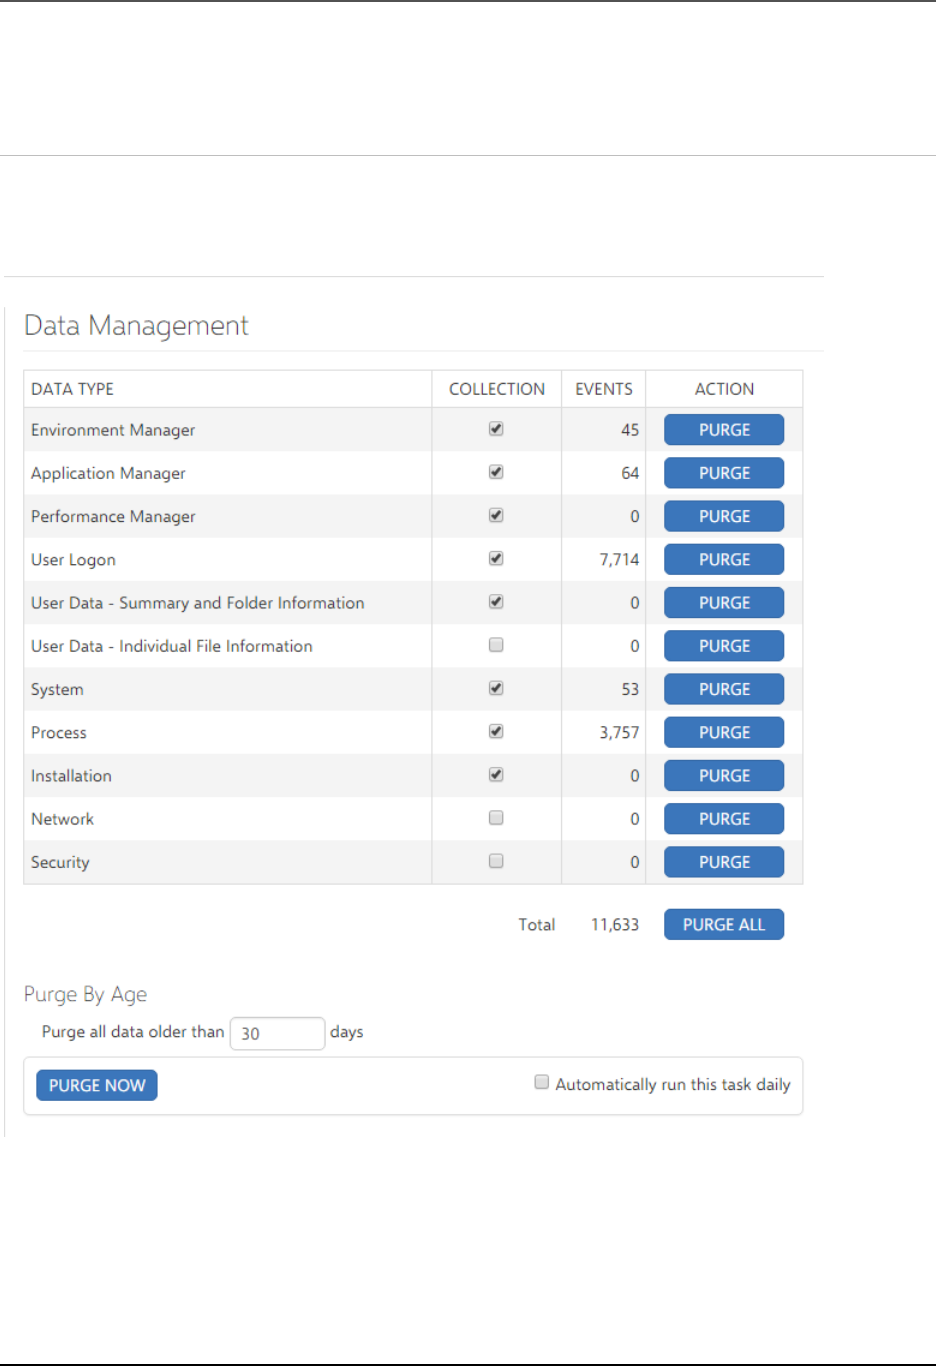
Data Management
Configure the settings for the collection of data from endpoints and the removal of data from the server.
To access these settings, select Settings > Data Management. The available data types are listed and
include options for collecting and purging data. Where data has been collected, the number of events
raised for each data type displays.
Copyright © 2016 , AppSense. All Rights Reserved.
Page 24 of 35
AppSense Insight 10.1 Install and Configure Guide
Configure Data Collection
Select the Collection check boxes for the data type you want to analyze. Data for the selected areas is
collected from endpoints which have the Insight Agent installed and included set up to communicate
with your server. The data is then analyzed and used in the appropriate Insight report.
CAUTION: Changing which data types are collected for can impact Insight reports functionality.
Copyright © 2016 , AppSense. All Rights Reserved.
Page 25 of 35
AppSense Insight 10.1 Install and Configure Guide
To further configure Data Collection, enter an Insight version number in the
Minimum Agent Version
section of the Data Management option. The server will only collect data from agents which match the
version specified or are newer.
Remove Data from an Insight Server
Permanently remove unwanted data from your Insight server. You can purge all collected data or only
that which relates to particular data types. Following a purge, data is permanently removed from the
server and data collection starts again for purged data types. You have the following options when
removing data:
Copyright © 2016 , AppSense. All Rights Reserved.
Page 26 of 35

AppSense Insight 10.1 Install and Configure Guide
l Remove data for individual data types - Click PURGE for the required data type.
l Remove data for all data types - Click PURGE ALL.
l Remove data for all data types based on the age of the data - In the Purge by Age settings, enter the
required number of days and click PURGE NOW. All data for the applications selected for collection,
which is older than the entered period of time, is deleted.
To set up a recurring task based on these settings, select Automatically run this task daily, otherwise
data is kept indefinitely.
Copyright © 2016 , AppSense. All Rights Reserved.
Page 27 of 35
AppSense Insight 10.1 Install and Configure Guide
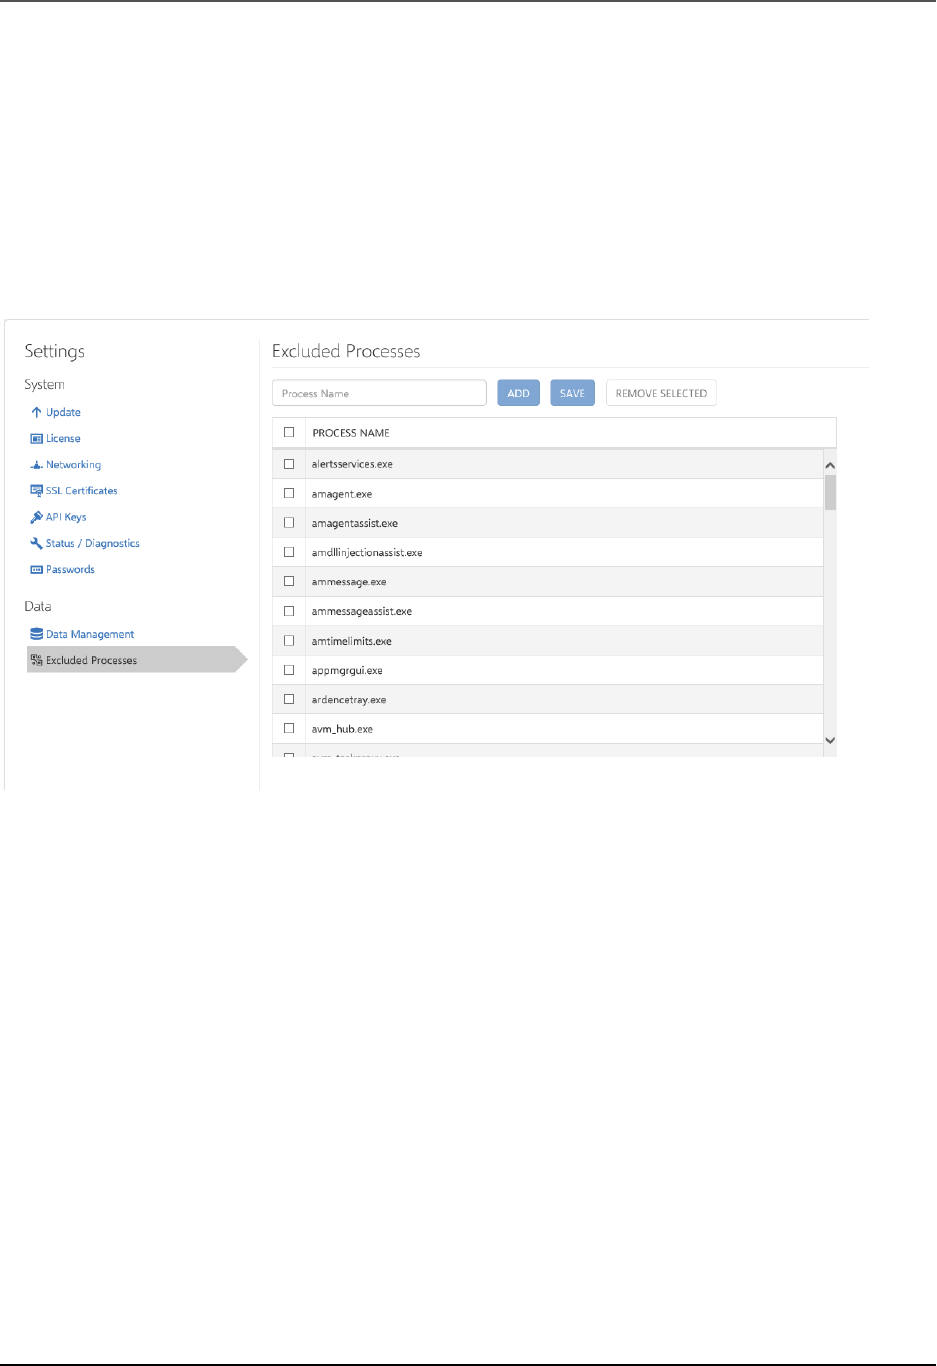
Excluded Processes
Data for processes in the Excluded Properties table is still collected by the Insight agent but is not
included in any report. The list is populated with default processes supplied by AppSense but can be
modified to create a bespoke list.
To add a process, enter the process name and click ADD.
To remove processes, select all those which are no longer required and click REMOVE SELECTED.
Once the required updates have been made, click SAVE.
Copyright © 2016 , AppSense. All Rights Reserved.
Page 28 of 35
AppSense Insight 10.1 Install and Configure Guide
Insight Agent
When installed on endpoints, the Insight Agent analyses activity to provide data about users, profiles,
and the endpoints.
Installed Files
The Insight Agent installs the following files to %Program Files%\AppSense\Insight on endpoints:
File Description
InsightService.exe Standalone executable that hosts a Windows service. This service captures
the static and dynamic information and sends it to the service.
InsightUpload.dll A COM component that is instantiated from the service and is responsible for
connecting to the server and sending the data.
InsightSenswrapper.dll A wrapper library for Windows SENS. This library is consumed by the service to
allow it to receive system event notifications.
InsightLogging.dll A DLL responsible for debug logging to a log file and raising audit events to
the Windows application event log.
Installed Services
The installation creates the AppSense Insight Service from the InsightService.exe executable file. This
service should be set to Automatic start and run under the LocalSystem account.
Agent Installer
The Insight Agent installer comes in 32 and 64-bit formats and can be downloaded from
https://support.appsense.com/.
1. Double-click the MSI compatible with the endpoint you are installing it on; either 32 or 64-bit.
2. Click Next.
The License Agreement displays.
Copyright © 2016 , AppSense. All Rights Reserved.
Page 29 of 35

AppSense Insight 10.1 Install and Configure Guide
3. If you accept the terms of the license agreement, select the checkbox and click Next. The install
location displays.
4. Browse to where you want to install the agent or use the default installation path: C:\Program
Files\AppSense\Insight
The Insight Agent Settings dialog displays.
5. Enter your Insight hostname.
6. Enter in the API key for your server. You can copy the key from the Settings area in the Insight
console.
For further details see API Keys.
7. Click Install to start the installation.
Copyright © 2016 , AppSense. All Rights Reserved.
Page 30 of 35

AppSense Insight 10.1 Install and Configure Guide
8. Click Finish to complete the installation.
Command Line Installer
The installer supports command line options used to configure the server and API key when deploying
the agent to endpoints.
The command line options populate the HKLM\Software\Policies\AppSense\Insight key with the relevant
values. The command line options are:
l INSIGHT_SERVER
l INSIGHT_KEY
Copyright © 2016 , AppSense. All Rights Reserved.
Page 31 of 35
AppSense Insight 10.1 Install and Configure Guide
Registry Key Settings
The AppSense Insight software reads its settings from the HKLM\Software\Policies\AppSense\Insight
registry key. The following table lists the configuration values:
Value Type Description
Logging DWORD If set to 1, all logging is enabled. The log file InsightDebug.log is located
in “%PROGRAMDATA%\AppSense\Insight”. The last log file is kept with
extension .old
Server REG_SZ The name of the server to which the Insight data should be uploaded.
The name should have the following format:
nextgen.appsensemobile.com
ApiKey REG_SZ The API generated on the Insight console that allows the service to
connect to the REST API.
WriteToFile DWORD If set to non-zero, collected data will write to the “InsightLocal.log” file in
the “%PROGRAMDATA%\AppSense\Insight” folder instead of sending it
to the server.
UploadFrequency DWORD The length of time, in milliseconds, between data uploads from clients to
the server. If this value is not present the default period is 120000 ms
(two minutes). The setting should not exceed 20 minutes.
MaxEvents DWORD The number of events that can be uploaded per poll. Any events beyond
the set number are added to the next poll. The default value is 1000.
CertificateFlags
CAUTION:
For use in
test labs only.
DWORD Suppress errors with the SSL Certificate for the target AppSense Insight
Server. This is useful for Test Labs where distribution of the SSL certificate
is problematic, or for diagnosing issues with the SSL Certificate.
Apply the values as required:
l 256 - Allow Untrusted Root Certificate Authority
l 512 - Allow Invalid Invalid Certificate Usage
l 4096 - Allow Invalid Common Name in Certificate
l 8192 - Allow Invalid Certificate Date
l 768 - Allow Untrusted Root CA & Invalid Certificate Usage
l 4352 - Allow Untrusted Root CA & Invalid Common Name
l 8448 - Allow Untrusted Root CA & Invalid Certificate Date
l 4608 - Allow Invalid Certificate Usage & Invalid Common Name
l 8704 - Allow Invalid Certificate Usage & Invalid Certificate Date
Copyright © 2016 , AppSense. All Rights Reserved.
Page 32 of 35
AppSense Insight 10.1 Install and Configure Guide
Value Type Description
l 4864 - Allow Untrusted Root CA, Invalid Certificate Usage & Invalid
Common Name
l 8960 - Allow Untrusted Root CA, Invalid Certificate Usage & Invalid
Certificate Date
l 12544 - Allow Untrusted Root CA, Invalid Common Name & Invalid
Certificate Date
l 12800 - Allow Invalid Certificate Usage, Invalid Common Name and
Invalid Certificate Date
l 13056 - Ignore all Certificate Errors
The default UploadFrequency and MaxEvents are recommended for environments with up to 4,000 users.
For environments of between 4,000 and15,000 users, increase these settings to the values shown in the
table below. For larger environments, where the UploadFrequency is increased to 20 minutes, it is
recommended that your appliance has a minimum of 8 cores and 16GB of ram.
Users UploadFrequency MaxEvents
0 to 4,000 2 1,000
4,001 to 15,000 20 2,000
NOTE: These recommended settings may require adjustment to get the optimum results for your
particular environment.
Copyright © 2016 , AppSense. All Rights Reserved.
Page 33 of 35

AppSense Insight 10.1 Install and Configure Guide
Group Policy ADMX Files
Download the ADMX template:
1. Navigate to AppSense Support.
2. Click Get Our Software > Insight.
3. Download the ADMX template ZIP file: AppSense_Insight_Agent_Configuration_including_Custom_
Settings_ADMX_Template.zip
The ZIP file contains:
l AppSense_Insight_Including_Custom_Settings.admx
l AppSense_Insight_Including_Custom_Settings.adml
The Insight Group Policy ADMX file can be used with both Local and the Domain-based Group Policy. Save
the ADMX file and merge the language folder in %systemroot%\PolicyDefinitions to make the policies
editable through Administrative Templates in either the Group Policy Object Editor or the Group Policy
Management Console.
For further details about editing local and domain-based GPOs with ADMX files, see
https://msdn.microsoft.com/en-us/library/bb530196.aspx
When you use the ADMX template to configure settings via a GPO, the registry values are written into the
Policies section in HKLM.
Registry settings are evaluated in the following order, with highest priority applied:
l HKLM Policy (HKLM\Software\Policies\AppSense\Insight)
l HKLM (HKLM\Software\AppSense\Insight)
Settings
Setting Description
AppSense
Insight
Server
FQDN
Determines which AppSense Insight Server the AppSense Insight Agent uploads data. The
name must be the Fully Qualified Domain Name (FQDN) for the target server. For example,
NAME.COMPANY.COM. Insight automatically prepends the server with HTTPS:// so the
protocol is not required. If a protocol is added, communication with the server will fail. The
default port (443) can be overridden by appending the FQDN, for example,
NAME.COMPANY.COM:10443.
AppSense
Insight
Server API
Key
Configures the API key that is passed to the server when uploading AppSense Insight data
from the agent. Get the key from the server by navigating to Settings > API Keys in the
Insight Web Console.
Copyright © 2016 , AppSense. All Rights Reserved.
Page 34 of 35

AppSense Insight 10.1 Install and Configure Guide
Custom Settings
Setting Description
AppSense
Insight
Agent
Upload
Frequency
Determines how often Insight Data is sent to the AppSense Insight Server and how often
checks are made for configuration changes to the event collection criteria specified in the
Settings > Data Management area of the AppSense Insight Web Console. If you enable
this policy setting, you can select the number of milliseconds that should elapse between
subsequent uploads of AppSense Insight data to the server. If you do not configure this
policy setting, AppSense Insight data is sent to the server once every 2 minutes.
AppSense
Insight
Server SSL
Certificate
Flags
Suppress errors with the SSL Certificate for the target AppSense Insight Server. This is
useful for Test Labs where distribution of the SSL certificate is problematic, or for
diagnosing issues with the SSL Certificate.
CAUTION: For use in test labs only.
AppSense
Insight
Agent
Local
Mode
Enables Local Mode for the AppSense Insight Agent. If enabled, all AppSense Insight
Agent data collected is written to the Analytics.log file in the
%PROGRAMDATA%\AppSense\Insight folder instead of sending it to the AppSense
Insight Server.
AppSense
Insight
Agent
Logging
Enables debug logging for the AppSense Insight Agent. If enabled, the log file
InsightDebug.log is created in the %PROGRAMDATA%\AppSense\Insight folder.
AppSense
Insight
Agent
Event Log
Filter
Determines which AppSense Insight event log events are raised by the AppSense Insight
Agent. Use a comma-separated list of the Events you wish AppSense Insight to raise in the
Event Log. Available Event IDs are:
l 9800 - Server Connection Status
l 9801 - Server Connection Failure including HTTP error code
l 9802 - Events uploaded including the count of uploaded events
Event ID 9800 & 9801 are raised by default prior to configuring this setting. Events are
raised with Event Source of
AppSense Insight
.
Copyright © 2016 , AppSense. All Rights Reserved.
Page 35 of 35
